https://khanna.cc/blog/structuring-deep-learning-projects/
You want to train a deep neural network. You have the data. It’s labeled and wrangled into a useful format. What do you do now?
When I have a deep learning project, I follow these six steps.
Step 1. Pick a cost function.
Step 2. Pick an initial network architecture.
Step 3. Fit the training set well on the cost function.
Step 4. Fit the validation set well on the cost function.
Step 5. Verify performance on a test set.
Step 6. Verify performance in the real world.
Step 1. Pick a Cost Function
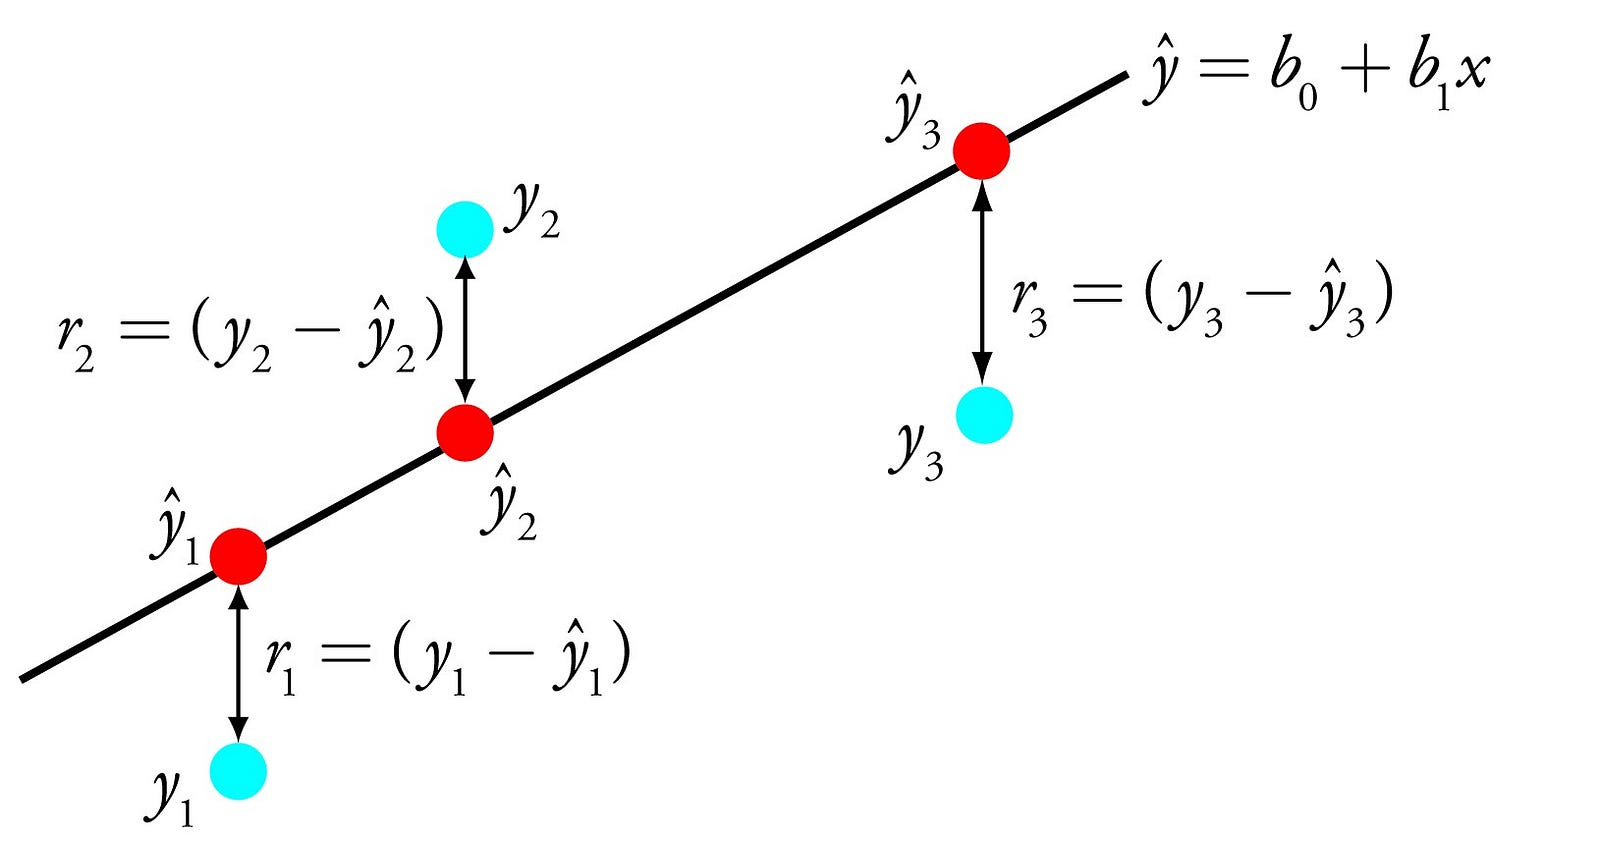
The appropriate cost function depends on the type of problem I’m
trying to solve. If I’m predicting an output value given an input value,
i.e., a regression problem, I use
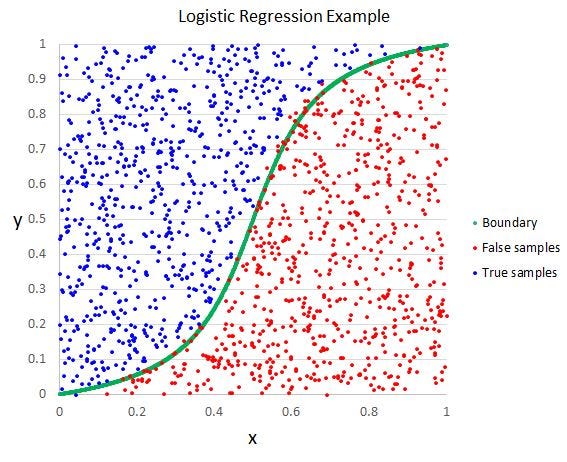
mean squared error (MSE) loss. If I’m solving a classification problem with more than two classes, use
cross-entropy loss. If there are only two classes, I use
binary cross-entropy loss. These standard loss functions are available in all major deep learning frameworks.
If I have an unusual problem, such as
One-Shot Learning, I may need to design and use a custom loss function.
Step 2. Pick an Initial Network Architecture
For
structured learning problems
like predicting sales, I’ve found one, fully-connected hidden layer to
be a good starting place. The number of activations in that layer should
be between the number of input neurons and the number of output
neurons. The midpoint between the two usually isn’t a bad choice.
I’ve also seen the following formula, which is fine as a starting point.
Nh=Ns(a(Ni+No))
Ni
= number of input neurons
No = number of output neurons
Ns = number of samples in the training set
a = an arbitrary scaling factor between 2 and 10
If I’m doing computer vision, the best place to start is one of the proven architectures like
ResNet.
Step 3. Fit the Training Set Well on the Cost Function
The most important hyperparameter in fitting the training set is the learning rate (
α
). I don’t bother with trial-and-error and instead use a
learning rate finder that I adapted from the
fastai library. The learning rate finder outputs a plot that looks like this:

I choose a learning rate where the loss is still clearly decreasing. I
tend to pick a point that is a little bit to the right of the steepest
point in the plot, i.e., where the loss is still strongly decreasing and
has not yet been minimized. In the above plot, I would choose a
learning rate of
10−4
.
If the model is training very slowly or not very well, I replace the initial
stochasic gradient descent optimization algorithm with
Adam optimization.
If the model still isn’t properly fitting the training set, I’ll add learning rate decay.
Learning rate decay is reported to have been tried a few different
ways: exponential decay, discrete “staircase” decay, and even manual
approaches where the experimenter will visually observe when the loss
stops decreasing and reduces
α
accordingly.
I prefer to use a cosine-shaped learning rate decay, which decays
α
over the course of an epoch
in the shape of a cosine curve. This makes the rate of decay slowest at
the beginning and end of the epoch and highest in the middle of the
epoch.
I’ll usually also add “restarts” which
restarts the learning rate at it’s non-decayed value at the beginning of each epoch (or some integer multiple of epochs).
If I’m using some form of
transfer learning, I’ll try unfreezing the earlier layers of the neural network and training it with
differential learning rates.
At this point, if I’m still having trouble fitting the training set, I
have a few more hyperparameters I’ll tune either sequentially or by
random selection in the hyperparameter space.
- number of units in hidden layer
- minibatch size, in powers of 2: 64, 128, 256, 512. Rarely, 1024.
- number of hidden layers
I don’t bother tuning
β1
,
β2 or
ϵ for the Adam optimizer, since it doesn’t seem to make much difference.
If, after all this, I still cannot fit the training data well on the
cost function, I consider whether the overall objective should be
refined. The training inputs simply may not have the right information
to predict the output I’m trying to fit.
A good example of this is trying to predict a stock’s future price
based solely on that stock’s historical prices. If a stock’s movement is
purely a stochastic process as it relates to its historical price, I’m
not surprised when I can’t predict it’s future price with a deep neural
network.
Step 4. Fit the Validation Set Well on Cost Function
This is the step where I mainly spend my time. Getting a deep neural
network to generalize well to a validation set is often the most
difficult part of the project. Your deep neural network at this point
almost assuredly performs better on the training set than it does on the
validation set. There is in other words at least some degree of
overfitting to the training set.
Here are the steps I take to reduce validation set loss.
Dropout
First, I’ll try applying
dropout, which randomly zeros-out activations in the training set during training with some probability
p
. There’s no great rule of thumb for how I set
p, but I’ll try a couple of things.
I’ll apply dropout before the last linear layer at
p=0.25
and I’ll run multiple experiments tuning dropout up to
p=0.50. If that doesn’t help, I’ll add dropout to earlier linear layers of the neural network with a similar range of
p=0.25 to
p=0.50.
Like I said, there isn’t a great rule of thumb here, so it ends up
being some experimentation and trial-and-error to determine which
combination of dropout probabilities in which layers is the most
effective at reducing validation loss.
Weight Decay / L2 Regularization
Second, I’ll add some form of weight decay, such as
L2 regularization.
This is a classic technique in machine learning that reduces
overfitting. It works by adding a term to the cost function that looks
like this:
λ2∑j=1nw2j
λ
= regularization hyperparameter
wj = feature
j in weight matrix
w
n = number of features in weight matrix
w
One of the causes of overfitting is large weights, and this form of
weight decay heavily penalizes large weights in the weight matrix. By
adding this term to the cost function, a gradient step change that
increases the size of the weights in the weight matrix must improve the
network more than the increased cost associated with larger weights. The
weight decay parameter
λ
is an important one that has to be tuned.
The third thing I’ll do to reduce overfitting is normalize the mean
and variance of the input features over the training set. That means the
average of input feature
x1
over all training examples
m should equal 0 and the standard deviation should be 1. Same with features
x2...xn.
In math terms, the vector
x(i)
containing all of the features
j for a single training example
i should be modified like this:
μ=1m∑i=1mx(i)x:=x−μ
μ
is a vector with size equal to the number of input features in a single training example.
x is a matrix of size
n by
m, where
n is the number of input features in a single training example and
m is the total number of training examples. The substraction operator in the second equation broadcasts the vector
μ such that that vector is subtracted from each of the columns of matrix
x.
The formula for normalizing the standard deviations should be familiar:
σ2=1m∑i=1m(x(i))2x:=xσ2
I want to reiterate that I normalize the mean and standard deviation for each feature over the
training set, not over the features for each sample in the training set. It seems obvious now, but that detail tripped me up initially.
Another important detail is that I keep track of the mean and
standard deviation of the inputs from my training set and use those
statistics to normalize the validation and test sets. In other words, I
don’t calculate a mean and standard deviation over the validation set or
test set data. Rather, I use the scaling factors from the training set
to scale my validation and test sets.
Batch Normalization
Batch normalization
is becoming an increasingly standard part of any deep neural network.
Whereas the previous technique normalized the input features, the batch
norm technique reduces overfitting by normalizing the mean and variances
of the
hidden layer activations.
Batch norm is done per-minibatch. Like the input feature
normalization, I use the mean and variances from the training set to
apply batch norm to the validation and test sets. But unlike input
feature normalization, batch norm is done per-minibatch and not over the
whole training set, so I actually use an exponentially weighted average
of the mean and variances from the training set.
That can be a little mind-bending, so I’ll say it another way. In
batch norm, the mean and variance is taken on an
activation-by-activation basis over the training samples in the
minibatch. Since that will yield as many means and variances as there
are minibatches, I then apply an exponentially weighted moving average
across the minibatches to obtain a final mean and variance to apply to
my validation and test sets.
More Training Data & Data Augmentation
In my experience, overfitting is probably best solved by adding more
data to the training set and continuing to train the network. Collecting
more data can be expensive and time-consuming, which is why it’s not at
the top of my list.
Another approach is to use data augmentation. Data augmentation is
the process of synthesizing data to increase the data available to train
the network. It is an excellent option in computer vision problems
where it can be done by adjusting the lighting, rotation, orientation,
or other visual characteristics of the image. In this way, for every
image, you could get five or more images from it by transforming it in
subtle ways. After all, if you’re trying to build a network that can
detect cars on the road, whether that car is oriented left or right, and
whether it is sunny or rainy, there is still a car in the photo.
Data augmention as applied to structured data or natural language processing has not really been studied.
Vanishing and Exploding Gradients
Often, I’ll encounter vanishing gradients or exploding gradients.
Vanishing gradients are where where the gradients become so vanishingly
small that the network does not learn well with gradient descent.
Exploding gradients are where the gradients become so large, they exceed
the capability of the computer to calculate.
A first pass at solving both the problem of exploding and vanishing
gradients is to initialize the weight matrices in a particular way:
so-called,
He initialization.
He initialization is characterized by initializing the weight matrix
W[l]
to a zero-mean gaussian distribution with a standard deviation of:
2l−1−−−−−√
Although I did not expect it, initializing the weights in this
particular way has profound effects on minimizing the likelihood of
vanishing or exploding gradients.
If I’m training a recurrent neural network for something like language processing, I’ll almost always default to using a
Long Short-Term Memory unit in my recurrent neural network, which also operates to reduce the likelihood of vanishing or exploding gradients.
Finally, a couple of notes about exploding gradients specifically. If I start to see
NaN
appear in my gradients, it’s likely that I have an exploding gradient
problem. A blunt but effective way of dealing with exploding gradients
is to use gradient clipping. Gradient clipping sets an upper bound on
the gradients. If the gradient exceeds a certain threshold, it is
“clipped” to the threshold value.
Neural Network Architecture Search
Sometimes, the tuning of these hyperparameters does not seem to make
much of a difference. No matter how we tune them, the training set loss
is still acceptably low, but the validation set loss is much higher. It
therefore often makes sense to take a hard look at the architecture of
the neural network. Too many features in the input can cause the network
to fit noise in the training set. Too many activations in the hidden
layers can do the same thing. So I tinker with the number of neurons in
the hidden layers, perhaps reducing them in one hidden layer but
increasing them in another hidden layer. Or I will increase or reduce
the number of hidden layers themselves.
This technique, like most of the techniques in reducing overfitting,
is a lot of trial-and-error. I often need to experiment with many
different architectures until I find one that works well.
If the neural network performs well on the training and validation
sets, I’m feeling pretty good about it. The main risk at this point is
that, in the process of optimizing the network and tuning the
hyperparameters, I’ve accidentally overfit my validation set.
When I fit the validation set to the cost function in Step 4, I
looked to the loss, F-score or some other optimizing metric with respect
to the validation set. In essence, I tuned the hyperparameters
specifically optimizing on the validation set. In that way, I may have
fit the hyperparameters (and therefore the neural network) to noise in
the validation set, and the network may generalize poorly to data it has
not yet seen.
So, in this step, I run the network on an as-yet-unseen test set to
confirm the same results I saw in the validation set. If the network
performs poorly on a test set, I increase the size of the validation
set, either by additional data or by data augmentation. I then repeat
Step 4 and fit the larger validation before coming back to this Step 5
to verify its performance on a test set.
Don’t tune your network’s hyperparameters with respect to the test
set loss! If you do, you’ll end up with a network overfit on your
training set, validation set
and test set and you won’t realize it.
Now the fun part! Make sure the network performs well in the real
world. If you’ve trained a cat classifer, start feeding the network
pictures of your cat. If you’ve trained a recurrent neural network
sentiment classifer for corporate press releases, feed it Microsoft’s
latest press releases and see how it does.
If the network performs poorly in the real world, but performs well
on the training, validation and test sets, something is wrong. You may
have overfit to your test set somehow. Change your validation and test
sets and see if the network still performs well on those. If it does,
and it still has issues performing in the real world, it may be time to
re-evaluate the cost function you are using (or your overall objective).
To be honest, I have not encountered this situation. In my
experience, if I successfully make it to this Step 6, the network does
not have issues in the real world.
Summary Checklist
Below is a short, checklist summary of the things to do or look out for in each step.
- Step 1. Cost Function
- Step 2. Initial Network Architecture
- Structured learning: one fully-connected layer with number of activations between input output layer sizes.
- Computer vision: start with ResNet.
- Step 3. Training Set
- Step 4. Validation Set
- Step 5. Test Set
- If there are issues, increase size of validation set and go back to Step 4.
- Step 6. Real World
- If issues, change validation and test sets and go back to step 4.
Acknowledgements
This post is inspired by my experiences in the
deeplearning.ai Coursera specialization as well as the
Practical Deep Learning for Coders course. Many thanks to Andrew Ng and Jeremy Howard for their hard work as educators.